Difference between revisions of "Pc con GNU/Linux/analisi stato SSD nvme"
| Line 93: | Line 93: | ||
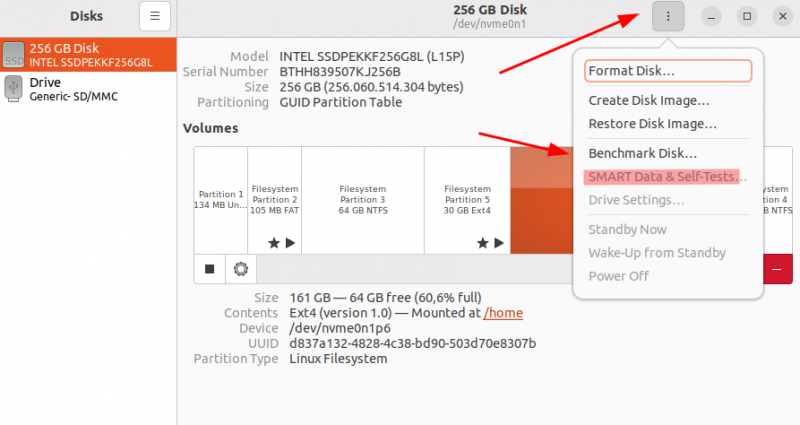
Un'alternativa grafica (anche se il terminale è decisamente più completo) si possono usare gli strumenti grafici del tool "disks" |
Un'alternativa grafica (anche se il terminale è decisamente più completo) si possono usare gli strumenti grafici del tool "disks" |
||
[[File:Disk-smart.png|none|800px|caption]] |
[[File:Disk-smart.png|none|800px|caption]] |
||
| + | |||
| + | === In alternativa, con gli NVME tools === |
||
| + | |||
| + | In alternativa, anche da una live, è possibile installare gli nvme-tools: |
||
| + | sudo apt update |
||
| + | sudo apt install nvme-cli |
||
| + | |||
| + | e quindi avere più o meno le stesse informazioni con il comando: |
||
| + | sudo nvme smart-log /dev/nvme0 |
||
| + | |||
| + | (e ovviamente i parametri vanno interpretati nello stesso modo) |
||
Revision as of 12:16, 26 April 2023
Installazione tool smart
Tipicamente questi tool non sono presenti di default nelle distribuzioni (e neanche nelle live fornite nelle chiavette PNLUG)
L'installazione, via terminale è banale. Ad es. per Debian, Ubuntu e derivate:
sudo apt update
sudo apt install smartmontools
Esecuzione diagnostica
Per eseguire la diagnostica che legge le informazioni dai log e contatori interni al disco SSD NVME, tipicamente identificato con /dev/nvme0, è sufficiente eseguire il comando:
sudo smartctl --all /dev/nvme0
Un output tipico è il seguente
ubuntu@ubuntu:~$ sudo smartctl --all /dev/nvme0
smartctl 7.1 2019-12-30 r5022 [x86_64-linux-5.11.0-27-generic] (local build)
Copyright (C) 2002-19, Bruce Allen, Christian Franke, www.smartmontools.org

=== START OF INFORMATION SECTION ===
Model Number:                       INTEL SSDPEKKF256G7
Serial Number:                      BTPY737015RQ256D
Firmware Version:                   PSF121P
PCI Vendor/Subsystem ID:            0x8086
IEEE OUI Identifier:                0x5cd2e4
Controller ID:                      1
Number of Namespaces:               1
Namespace 1 Size/Capacity:          256,060,514,304 [256 GB]
Namespace 1 Formatted LBA Size:     512
Local Time is:                      Fri Apr 14 19:25:24 2023 UTC
Firmware Updates (0x12):            1 Slot, no Reset required
Optional Admin Commands (0x0007):   Security Format Frmw_DL
Optional NVM Commands (0x001e):     Wr_Unc DS_Mngmt Wr_Zero Sav/Sel_Feat
Maximum Data Transfer Size:         32 Pages
Warning  Comp. Temp. Threshold:     70 Celsius
Critical Comp. Temp. Threshold:     80 Celsius

Supported Power States
St Op     Max   Active     Idle   RL RT WL WT  Ent_Lat  Ex_Lat
 0 +     9.00W       -        -    0  0  0  0        5       5
 1 +     4.60W       -        -    1  1  1  1       30      30
 2 +     3.80W       -        -    2  2  2  2       30      30
 3 -   0.0700W       -        -    3  3  3  3    10000     300
 4 -   0.0050W       -        -    4  4  4  4     2000   10000

Supported LBA Sizes (NSID 0x1)
Id Fmt  Data  Metadt  Rel_Perf
 0 +     512       0         0

=== START OF SMART DATA SECTION ===
SMART overall-health self-assessment test result: PASSED

SMART/Health Information (NVMe Log 0x02)
Critical Warning:                   0x00
Temperature:                        15 Celsius
Available Spare:                    100%
Available Spare Threshold:          10%
Percentage Used:                    1%
Data Units Read:                    3,803,389 [1.94 TB]
Data Units Written:                 6,666,049 [3.41 TB]
Host Read Commands:                 63,347,436
Host Write Commands:                111,605,940
Controller Busy Time:               1,374
Power Cycles:                       519
Power On Hours:                     2,601
Unsafe Shutdowns:                   61
Media and Data Integrity Errors:    0
Error Information Log Entries:      0
Warning  Comp. Temperature Time:    10
Critical Comp. Temperature Time:    0

Error Information (NVMe Log 0x01, max 64 entries)
No Errors Logged
Numeri significativi per capire lo stato del disco sono:
Percentage Used: se a 100% indica che la vita stimata nominale dell'SSD è stata raggiunta. Questo non vuol dire che l'SSD non sia più utilizzabile (può arrivare anche oltre 200%, ma un buon valore è attorno al 10-20% al massimoPower On Hours: indica le ore in cui il disco è stato acceso (ovvero utilizzato nel sistema). Non troppo significativo dell'usura, ma può dare un'indicazione dell'età del disco stesso
Devono essere a ZERO:
Media and Data Integrity ErrorsError Information Log Entries
Un'alternativa grafica (anche se il terminale è decisamente più completo) si possono usare gli strumenti grafici del tool "disks"
In alternativa, con gli NVME tools
In alternativa, anche da una live, è possibile installare gli nvme-tools:
sudo apt update
sudo apt install nvme-cli
e quindi avere più o meno le stesse informazioni con il comando:
sudo nvme smart-log /dev/nvme0
(e ovviamente i parametri vanno interpretati nello stesso modo)
